Arduino Read Analog Voltage From 3v Battery
Originally published by Mar 31, 2020
This commodity was translated to English, and was originally published for deviceplus.jp.
Tabular array of Contents
- Introduction
- Catechumen analog values to digital values
- Analog input with Arduino
- Arrange voltage with Book
- Analog input with Volume
- Conclusion
- Related articles
Introduction
With digital input, 5V can be read as HIGH and 0V as LOW. You can determine whether a switch is on based on which country information technology is in. Still, electricity is not only 5V and 0V, just various voltages. For example, one AA bombardment is 1.5V, and a household outlet is 100V.
Arduino supports analog inputs to read these various voltages. Analog inputs enable you to read the land of electronic components that change gradually. For case, you tin can apply book to arrange brightness or loudness or a temperature sensor to become the current temperature.

This article is the last in the serial. We will explicate analog input using volume.
Convert analog values to digital values
Actual voltage is not an exact value such as 1V or 5V, but an irrational number, in which numerical values continue forever after the decimal signal, such every bit 5.01342…V. These values cannot be directly handled by a figurer. In electronic circuits, therefore, analog values are converted to digital values using a mechanism called Advertizement converter so that the value tin can be handled by a computer. Arduino as well has an AD converter by default, which can read analog voltages and convert them into digital values.
The AD converter divides the target voltage into several equal parts. For Arduino Uno, voltages tin exist read in the range of 0-5V. These 0-5V values are divided into 1023 equal parts. The Advertizement converter converts the analog voltage reading to the nearest equal value. If the voltage is 3V, for case, "614" is the closest value. This value tin be sent to Arduino for use.

Integer values up to 1023 are used to process the program. Withal, the input value is non a voltage value. If y'all desire to know the voltage value, you tin can calculate information technology equally follows:

For example, if the value from the AD converter is "614", you can obtain about 3V by dividing by 1023 and and then multiplying by 5.
Analog input with Arduino
With Arduino Uno, yous tin can use half-dozen pins for digital input, A0 to A5. By connecting electronic components here for the input, you can read how much voltage is applied. Yet, pins A4 and A5 are also used for digital advice called I2C. Note that these pins cannot be used for analog input when connecting electronic components such as sensors or displays that use I2C digital communication.

Arrange voltage with Volume
"Book" is an electronic function that tin be used to accommodate the audio volume or lighting brightness. The volume contains terminals moving on the resistive element. The resistance can exist changed past moving these terminals.
The volume generally has three terminals. The left and right terminals are fastened to both ends of the resistor. The center concluding is designed to motility on the resistive chemical element. If you move the center terminal to the right, the resistance betwixt the left and eye terminals increases. Conversely, if you lot move information technology to the left, the resistance decreases.

In the figure above, the resistance element is linear, simply in the rotary volume, the internal resistance element is round. Although the shapes are different, they basically operate the aforementioned mode.
The Arduino analog input uses the voltage change for the input. Since the resistance changes in the volume, however, it is not possible to read the volume change by connecting it straight to Arduino. Therefore, the resistance modify should be converted to a voltage change. Connect the power supply and GND to the left and right terminals of the resistor. The voltage at the center last changes depending on the final position. Assume that the left terminal is connected to GND, and the right last is connected to a ability supply (5V). The voltage increases as the center terminal moves to the correct, and it decreases equally the terminal moves to the left. The left finish is 0V and the right end is 5V, so the value can be inverse inside the range of 0 to 5V.
If this center terminal is connected to the Arduino analog input terminal, the input tin can be changed by moving the volume.

Analog input with Book
Now let'due south attempt analog input using the volume. Prepare the post-obit electronic components.
Volume pod

The volume pod contains the resistance value of the range that can exist changed. It is good to use a 10kΩ volume for the Arduino input. The volume will exist easier to movement, if a knob is attached to the rotation centrality of the volume.
Alligator-clip jumper line

Useful for attaching a volume pod. Pinch the volume terminals with the clip-shaped connectors. The linked product is bachelor every bit a prepare of two red lines and two black lines.
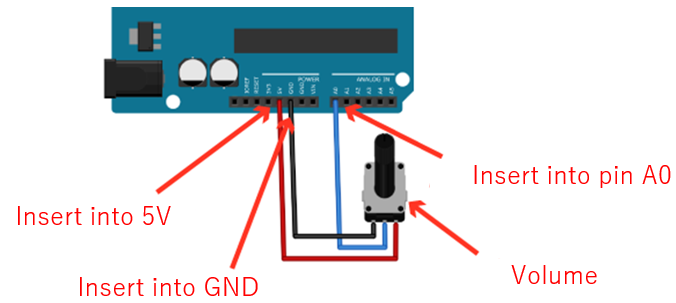
When you have prepared the components, connect them every bit shown in the effigy beneath. Since the volume pod cannot be plugged into the breadboard, use an alligator-clip jumper line to connect it directly to Arduino. Brand sure that the metal function of the alligator clip does not bear upon the adjacent clip part.
Write the following program:
To check the state where the analog input pin is continued, specify the target pin in "analogRead()" (line eleven). Then, input the voltage of the pin with the value of 0 to 1023. If you want to know the voltage, it is calculated and converted to voltage as in line 13.
Write the program to Arduino and display the serial monitor.
The value digitized by the Advertising converter is displayed after "Value:", and the value calculated and converted into voltage is displayed subsequently "Volt:". You can see that the value changes every bit the volume is rotated.

Conclusion
In this series, we introduced the usage underlying Arduino. Try operating a variety of electronic components and creating programs based on the content explained in this series. Give thanks y'all very much for following this half-year serial to the terminate!
Related Articles
Explore the rest of this series to go to know virtually the nuts of Arduino:
- The Basics of Arduino: Adjusting LED Brightness
- The Nuts of Arduino: Controlling the Motor
- The Nuts of Arduino: Reading Switch States
- The Basics of Arduino: Control LED Lighting with Digital Output
- The Basics of Arduino: Prepping the Arduino
Check us out on Social Media
Source: https://www.deviceplus.com/arduino/the-basics-of-arduino-reading-voltage/
Postar um comentário for "Arduino Read Analog Voltage From 3v Battery"